Introduction
Achievers POS is a complete inventory and point-of-sale software designed to help you manage your products, sales, purchases, and employees all in one place. Whether you run a retail store, supermarket, or wholesale business, Achievers POS offers responsive design, easy customization, and rich business intelligence features.
Support
We are happy to provide support for any issues within the Achievers POS system. For assistance or feature requests, please contact our support team through the official channels listed on our website. We do not provide support through social media or unofficial means.
Customer Display Screen
The Customer Display Screen enables customers to view their order details in real time during the billing process. This feature enhances transparency, improves trust, and engages customers by clearly displaying item names, individual prices, and the total payable amount.
How to View the Customer Display Screen
To access the Customer Display Screen, follow these steps:
Step 1:Navigate to the POS screen, where you will see a screen icon.
Step 2:Click on the icon to open the Customer Display Screen in a new browser tab.
Once opened, any changes you make in the POS screen—such as adding, deleting, or updating product prices—will be instantly reflected on the Customer Display Screen in real time.
.png)
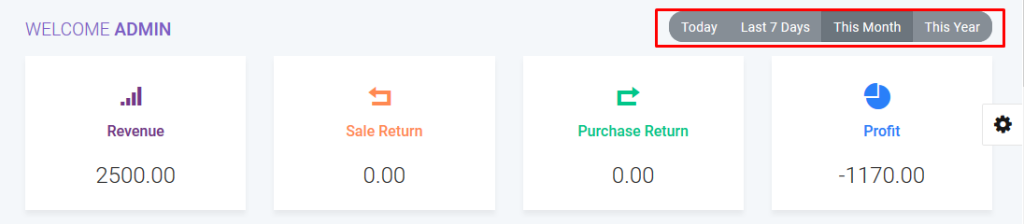
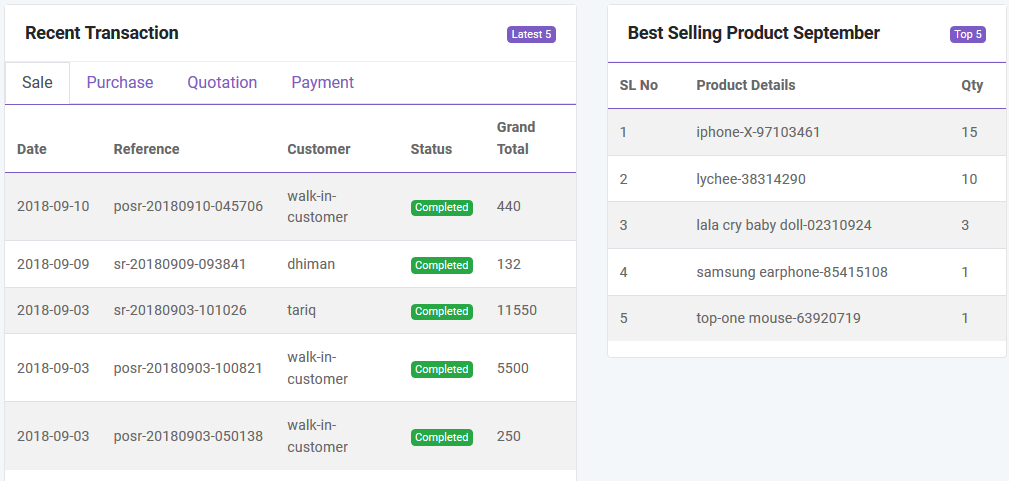
Dashboard
We have a gorgeous looking dashboard for our customer from where they get Revenue, Sale Return, Purchase Return and Profit information of today / last 7 days / current month / current year at a glance by one click.
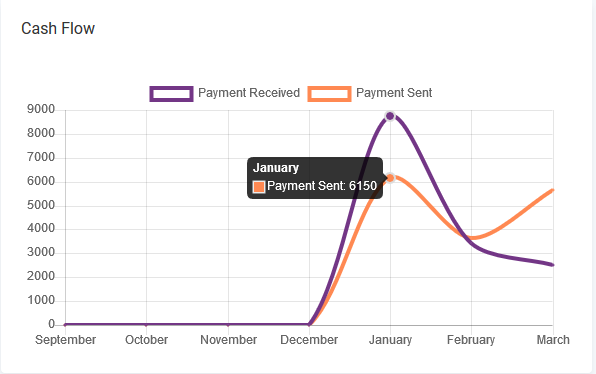
Dashboard
You will get information of your cash flow that means how much money you are earning and how much money you are spending from this line chart.
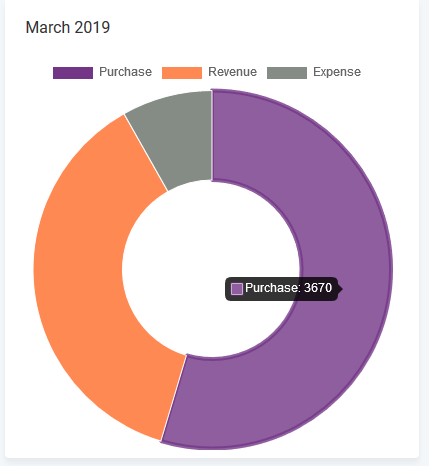
You also aware of your current month’s purchase, revenue expenditure froms this doughnut chart.
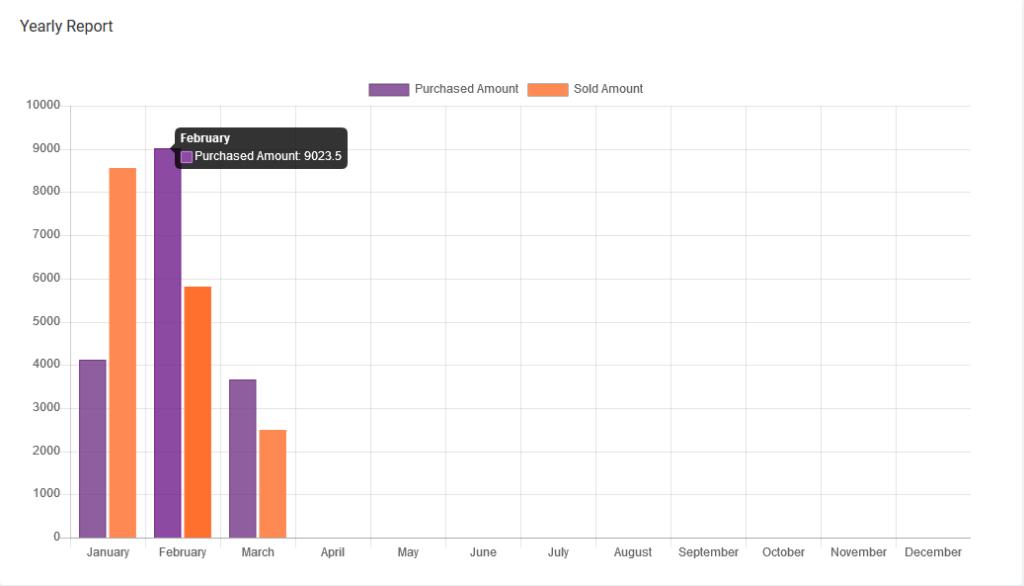
A bar chart shows Yearly report of purchases and sales of current year.
From Dashboard You will also get recent transaction(sale, purchase, quotation, payment) and top 5 best selling product of current month and current year.
Product List
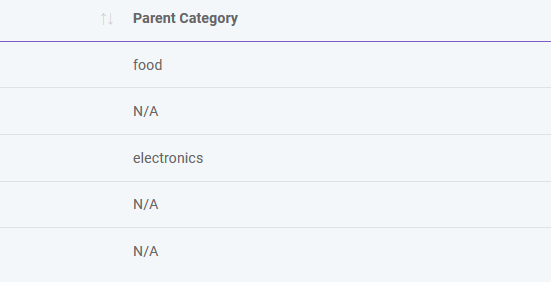
Category
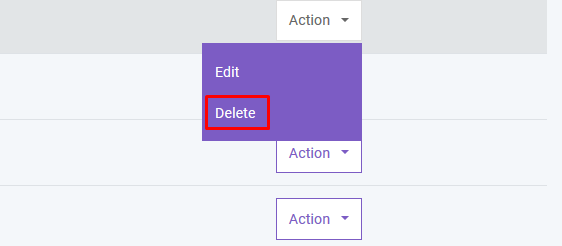
You can add, edit and delete product category. You can also import category from CSV file and export table data to PDF, Excel, CSV. Also you can print data from table.


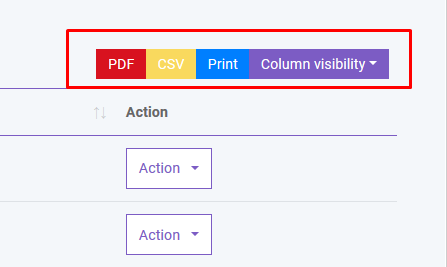
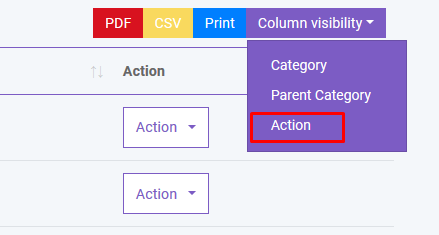
If you don’t want to export any column you can do this by clicking Column Visibility button. From here you can choose column to remove from table.
To export data from specific row you just have to check the checkbox of the related row

If you want to delete all the row from table you can do this very easily as shown below. You can also delete specific row from table.
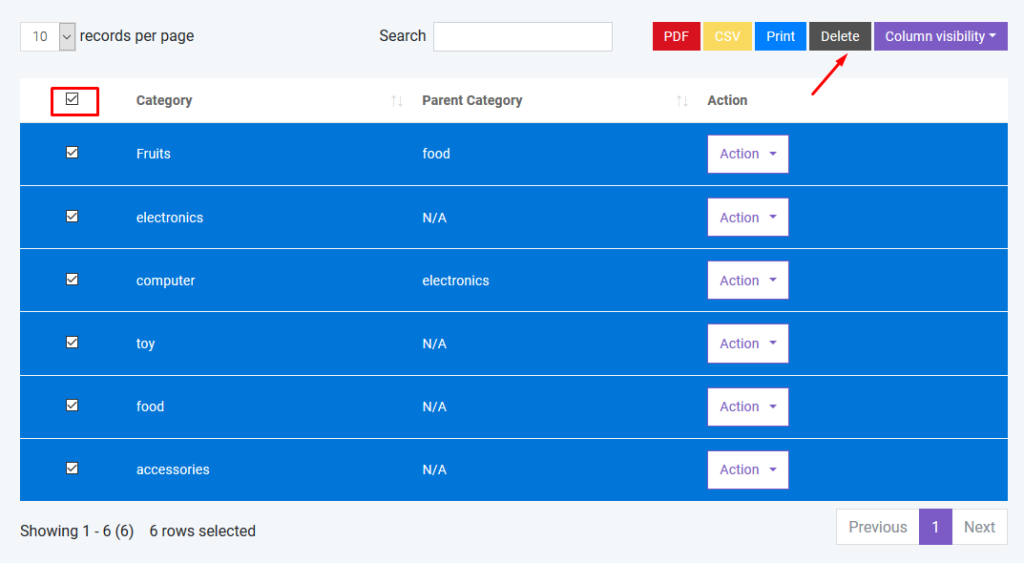
If you want to search anything from the table you can simply type the word in the search box.

You can also control the pagination from Show dropdown.

Product
In product section you will just add general information of a product. To add stock you have to purchase that product. You can create three types of product in Achieves POS.
- Standard
- Digital
- Combo (Combination of standard product. Like mango juice is a combo product as it is consist of mango and sugar ).
- Service
You can add, edit and delete product. You can import product from CSV. You must follow the instruction to import data from CSV. To get better understanding you can download the sample file.

You can sort table data according to column

And you can search, export and print data from table that we discussed earlier in greater detail.
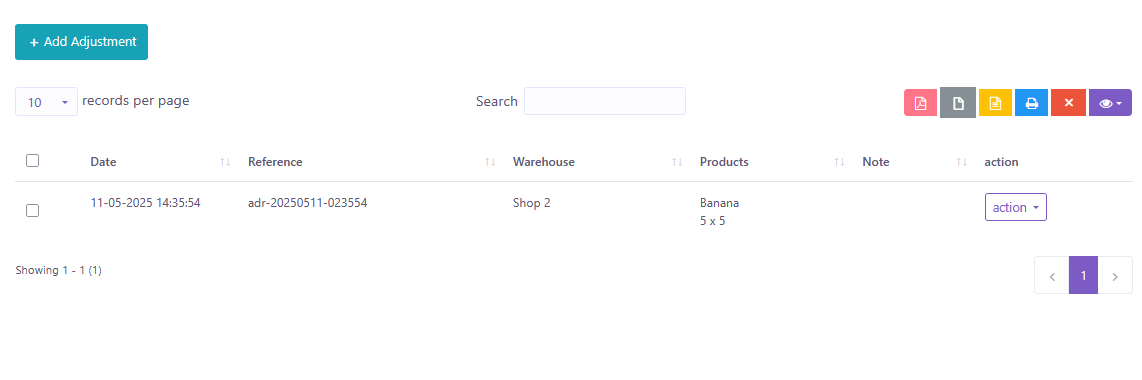
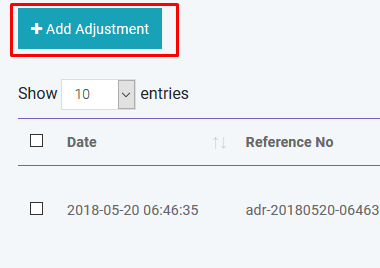
Adjustment
If you want to Adjustment for products like, adding or subtracting their quantity then you can do this from here. For create an Adjustment, click Add Adjustment and if you want to Edit or Delete an Adjustment then use actions.
Stock Count
If you want to see what is the quantity of products for a specific Warehouse or All Warehouse then you can see from here.

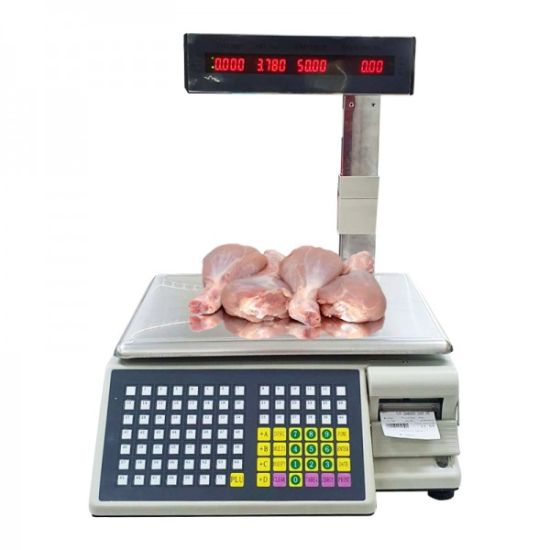
Weight Scale
Achievers POS is compatible with weight scale machine. But you have to follow the rules strictly. In a weight scale machine the machine will give you a label of 13 digits barcode. Consider the following picture:
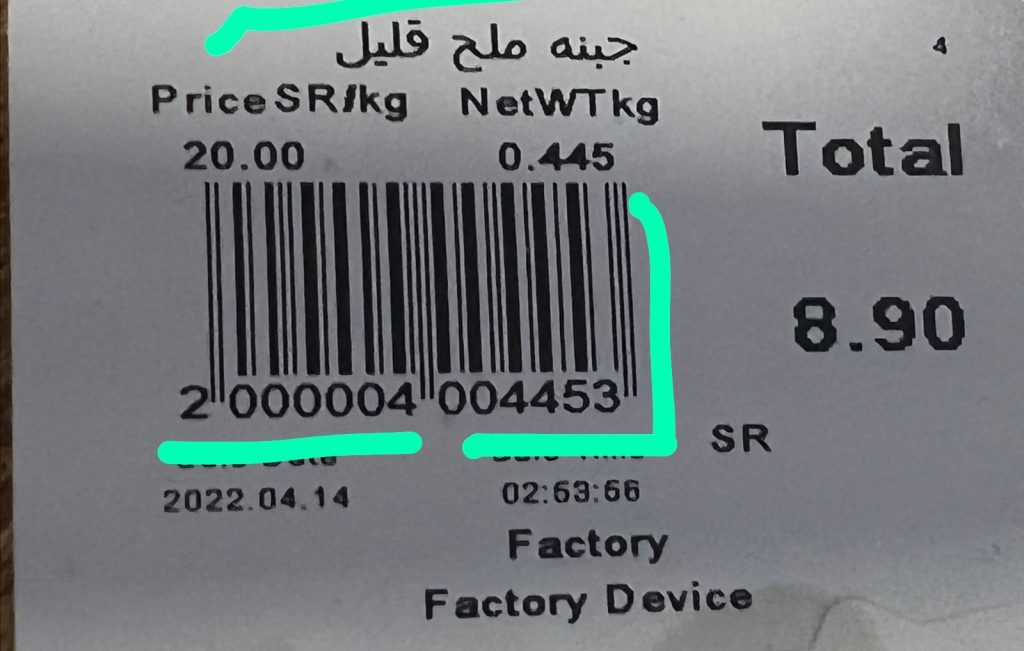
Here first 7 digits are the product code which must be similar with the product code of SaleProPOS. Next 5 digits contains weight and the last digit is a random number. Whenever you put a product on a weight scale machine it will generate this type of label automatically. Then all you have to do is scan this label. Product’s info and weight will be calculated automatically with SaleProPOS. But the product code must be same both for SaleProPOS and weight scale machine.
Print Barcode
You can print barcode with Achievers POS. The available paper sizes are 36mm, 24mm and 18mm. Anything other than that might not work correctly. To print barcodes we highly recommend using Brother Label Printer.
Adding Stock
In Product section you just added general information of product. So where the stock comes from? To add stock you have to purchase that product for specific warehouse. This software is pretty smart that it will automatically update the stock quantity and you don’t have to worry about it.
Purchase
Add Purchase
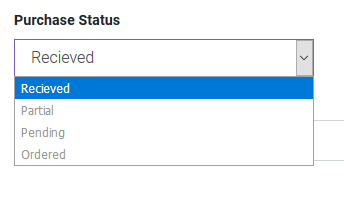
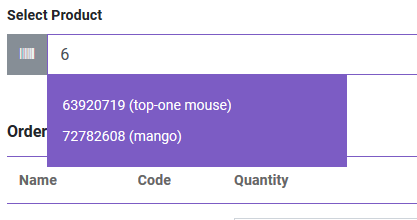
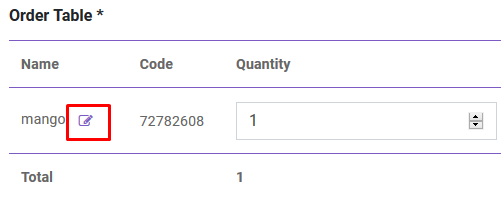
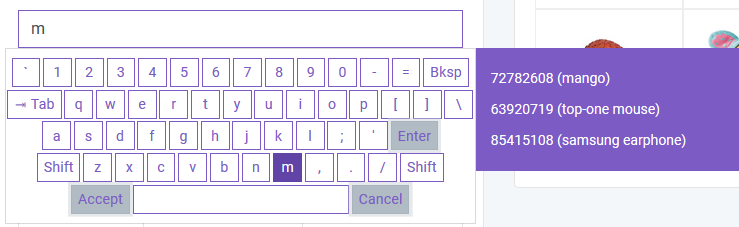
You can create purchase in Purchase module. By creating purchase the stock quantity of product will be increased. .There are three purchase status: Recieved, Partial, Pending, Orderd. You can add product to order table by typing or scanning barcode of product.
You can also edit product info from order table.
After creating purchase you will be redirected to purchase index page. You will get summary of purchase from table. To get details you just have to click in the table row.

Import Purchase
You can import sale from CSV.You must follow the instruction to import data from CSV. To get better understanding you can download the sample file.

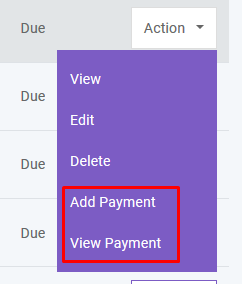
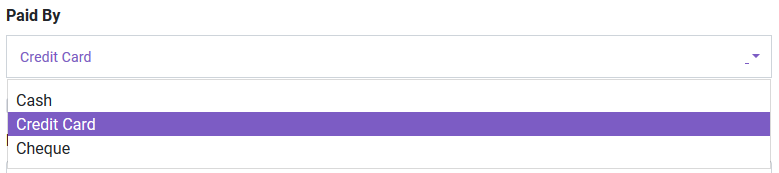
Payment
You can make payment from Purchase table. You can make payment with Cash, Gift Card, Cheque, Credit card and Deposit.
And you can search, export and print data from table.
Sale
POS
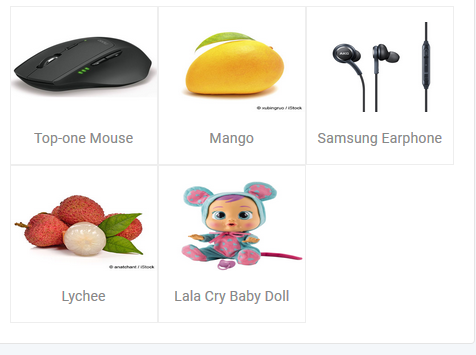
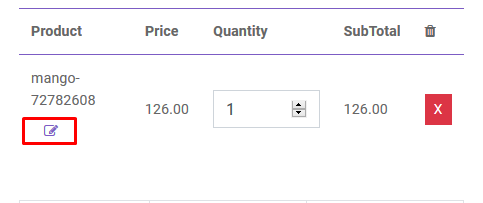
You can create sale from POS. Customer, Warehouse and Biller (representative of your company) will be automatically selected according to POS Settings under Settings menu. Touch screen keybord is activated in POS module. You can add product to order table by typing or scanning barcode of product. Featured Product will be displayed in the right side. You can also add product by clicking product image. You can edit product info from order table.
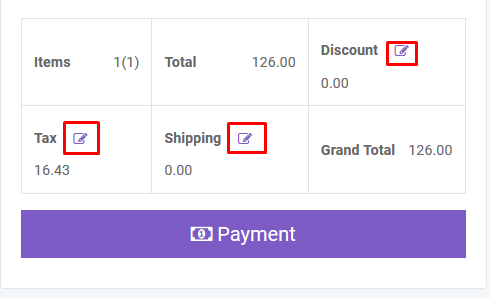
To add order discount, order tax and shipping cost you just have to click the button that are shown below. To finalize the sale you have to click the Payment button.
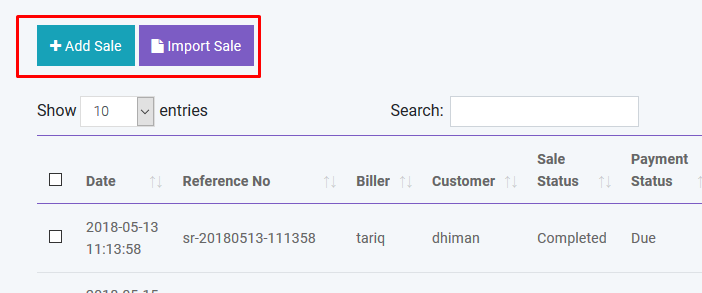
After creating sale you will be redirected to sale index page. A confirmation mail will be sent automatically to customer’s email with sale details. You will get summary of sale from table. To get details you just have to click in the table row.
You can also generate Invoice automatically which is beutifully designed.

You can also create sale by clicking Add Sale button. Also you can import sale from CSV.You must follow the instruction to import data from CSV. To get better understanding you can download the sample file.
Delivery
You can add delivery for your sold products. A confirmation mail will be sent automatically to customer’s email with delivery details.
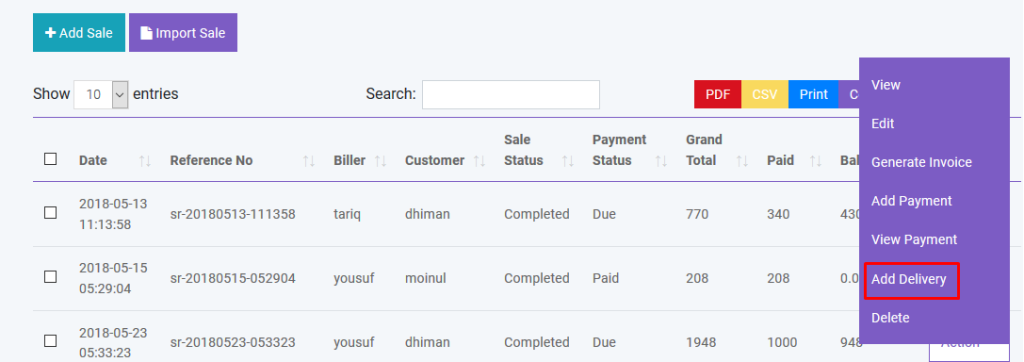
And you can search, export and print data from table.
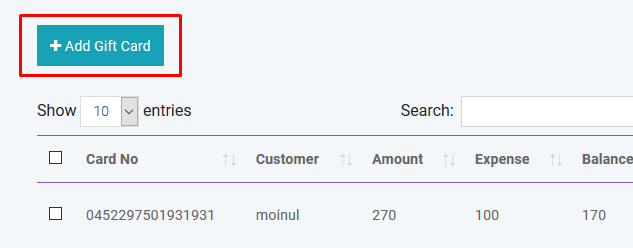
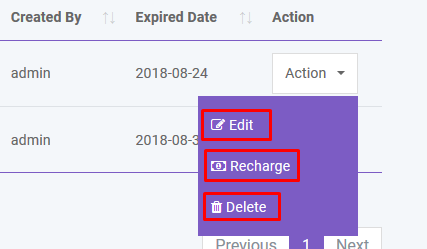
Gift Card
You can sell GiftCard to customer. By using gift card customer can purchase product. Again GiftCard can be recharged. Customer will be notified by mail when assigning or recharging a GiftCard
Packing Slip
You can sell GiftCard to customer. By using gift card customer can purchase product. Again GiftCard can be recharged. Customer will be You can create Packing Slip from sale list for Pending Sales. From sale list, go to to ‘action’ for any pending sales and you’ll see ‘create packing slip’ option

Challan
You can create Challan by selecting one or many Packing Slip from here.

You can finalize Challan from here.

Coupon
You can Create, Edit, and Delete coupon from this page.

Courier
You can Create, Edit, and Delete your desired Courier from this page.

Expense
Expense Category
You can create, edit and delete expense category in Expense module.

Expense
You can create, edit and delete expense in Expense module.
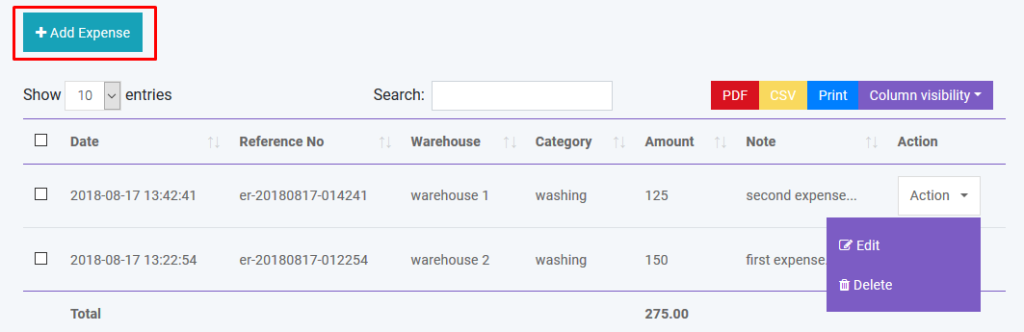
And you can search, export and print data from table.
Income
Income Category
You can create, edit and delete income category in Income module.

Income
You can create, edit and delete income in Income module.

And you can search, export and print data from table.
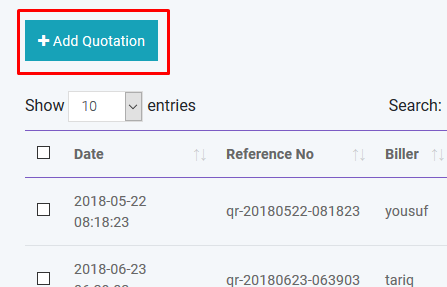
Quotation
Add Quotation
You can create quotation in Quotation module. There are two quotation status: Pending and Sent
If quotation status is Sent a confirmation mail will be sent automatically to customer’s email with quotation details.
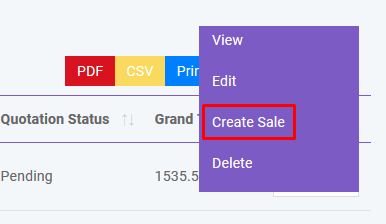
Create Sale
You can create sale from Quotation.
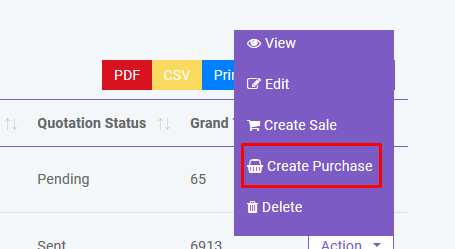
Create Purchase
You can create purchase from Quotation.
And you can search, export and print data from table.
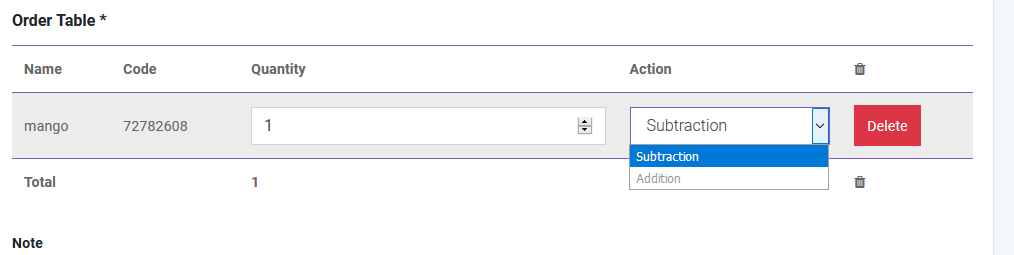
Quantity Adjustment
You can adjust product quantity in Quantity Adjustment module. There will be two operation: Subtraction and Addition
Stock Count
You can count your stock from this module. Two types are available:
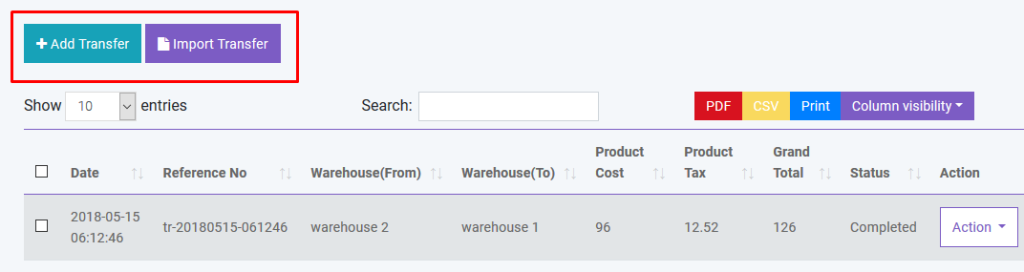
Transfer
You can transfer your product from one warehouse to another in Transfer module. You can also transfer product with CSV file.
Return
Sales Return
You can return your product with Return module. A confirmation mail will be sent automatically to customer’s email with return details if customer refund products. Again if you return product to supplier a confirmation mail will be sent automatically to supplier’s email with return details. You will get details of return by clicking in the table row.

Purchase Return
You can return your purchase with Return module. Here you will also have same functionality like Sale Return.

Accounting
You can create,edit and delete account to link all your transactions. You can also set default account for sale. All the payments must be done under an account.

You can generate
Also, you can
HRM
Department
You can create,edit and delete department of your company.
Employee
You can create,edit and delete employee of your company. You can also give user access to employee.
Attendance
You can take employee attendance with this software. You can set CheckIn and CheckOut time in HRM Setting option under Setting Module.
Payroll
You can make payroll of your employee with this software. All payroll must be done from an specific account.
Holiday
You can create Holiday whichever days you want and also, you can Edit or Delete them.
People
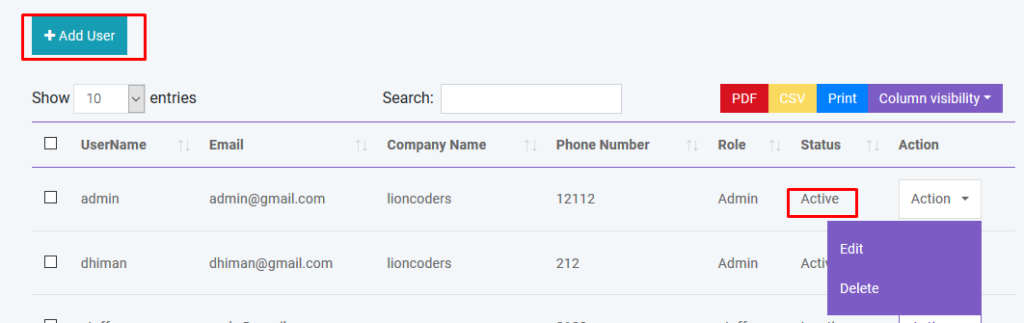
Add User
You can create, edit and delete user account. By creating user account password will be sent to the user’s email that is given. Again you can active or inactive a user.
There is also be a register option to create user account. But his/her ID will not be activated until admin will approve it.
Add Customer
You can create, edit and delete customer. After creating customer a confirmation email will automatically send to customer. You can add money to customer’s database just like a bank account. You can also import customer with CSV file.


Add Biller
Biller is the representative of your company. You may have multiple company and you want to manage all your inventory from a single platform. So this is a solution for enterprise. You can create, edit and delete biller. After creating biller a confirmation email will automatically send to biller. You can also import biller with CSV file.

Add Supplier
Supplier is the people from whom you purchase products. You can create, edit and delete supplier. After creating supplier a confirmation email will automatically send to supplier. You can also import supplier with CSV file.

Reports
You can create generate various reports automatically by using Achievers POS
- Purchase/Purchase Return
- Sale/Sale Return
- Profit Loss
- Payment Received/Payment Sent
- Income/Expense
- Payroll
- Warehouses
- Best Seller
- Product Report
- Daily Sale
- Monthly Sale
- Daily Purchase
- Monthly Purchase
- Sale Report
- Challan Report
- Sale Report Chart
- Payment Report
- Purchase Report
- Customer Report
- Customer Group Report
- Supplier Report
- Supplier Due Report
- Warehouse Report
- Warehouse Stock Chart
- Product Expiry Report
- Product Quantity Alert
- Daily Sale Objective Report
- User Report
- Biller Report
Settings
Invoice Settings
We have fully customizable Invoice Settings. Please go to Settings -> Invoice Settings.

Here you can change Default Invoice Settings, Create a new Invoice Settings, Update an Invoice Settings or Delete.

Role Permissions
You can create, edit and delete user roles. You can controll user access by changing the role permission. So, under a certain role users have specific access over this software

SMS Template
You can create SMS Templates for sent SMS easily and obviously this can save your time. You can also Edit and Delete them from action button.

Custom Field List
Here is a great thing you can do. You can add custom field list for Product, Sale, Purchase, and Customer. You can also Edit and Delete them.

Discount Plan
Discount Plan for a specific customer or more then one customers. You can Create, and Edit Discount Plan.

You can Inactive a Discount Plan any time from Edit. You can do this also while creating one.

For Creating a Discount you must have at least a Discount Plan. You can choose this Discount for all Products or a specific one. Also, you can choose days for Discount like, if you choose Friday then it will only available for Friday.

Discount
You can Create and Edit Discount. See the picture below.

All Notification
Here, you can see list of all notifications you’ve sent to your customers.

Send Notification
Notify your customers and staffs about something special or to do. Here, in the User field you can select your customer to send notification.

Add Warehouse
You can create, edit and delete warehouse. You can also import warehouse with CSV file.You must follow the instruction to import data from CSV.

Add Customer Group
You can create, edit and delete customer group. Different customer group has different price over the product. You can modify this by changing price percentage in Customer Group module.
You can also import customer group with CSV file. You must follow the instruction to import data from CSV.

Add Brand
You can create, edit and delete product brand. You can also import brand with CSV file.You must follow the instruction to import data from CSV.

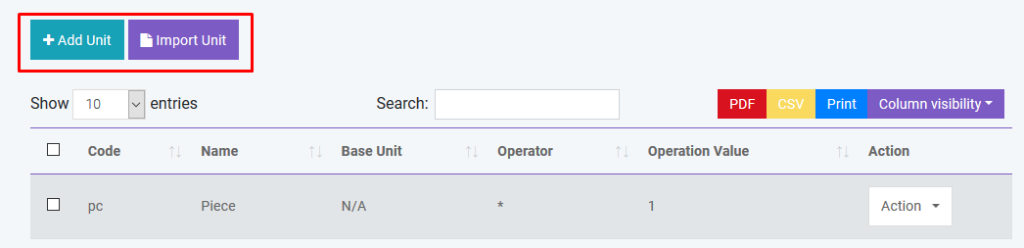
Add Unit
You can create, edit and delete product unit. You can also import brand with CSV file.You must follow the instruction to import data from CSV.
Currency
You can add Currencies from here. Also, you can Edit them. So, how it works? We consider Base is US Dollar so, if you see the Currency Taka which has exchange rate 121. Now, if you set a price 2 US Dollar for your product then price in BDT will be 242 Taka. Be careful here cause, if you don’t set exchange rate properly then your product price will become weird.

Add Tax
You can create, edit and delete different product tax. You can also import tax with CSV file. You must follow the instruction to import data from CSV.

User Profile
You can Edit your profile and also, you can change your password too.

Create SMS
You can sent SMS to one or many customers from here. You don’t need to provide phone number just search and select customer and our system will automatically select number of that customer’s.

Backup Database
To prevent any uncertain situations you can always keep you data backup. Just click and it will download to your Computer.
General Settings
You can change Site Title, Site Logo, Currency, Time Zone, Staff Access, Date Format and Theme Color from general settings
Reward Point Setting
You can set Sold amount per point and Minimum amount to get points and you can set duration for these points. Also, you can Active or Inactive points.

Payment Gateways
Currently, we have these payment gateways, PayPal, Stripe, RazorPay, PayStack, Mollie, Xendit, Bkash, SSLCommerz, Mpesa, Pesapal, and Moneipoint. You can use any of them or multiple by provide your credentials for them.
Barcode Settings
You customize your Product’s Barcode from Barcode Settings.
User Profile
You can update user profile info from this module
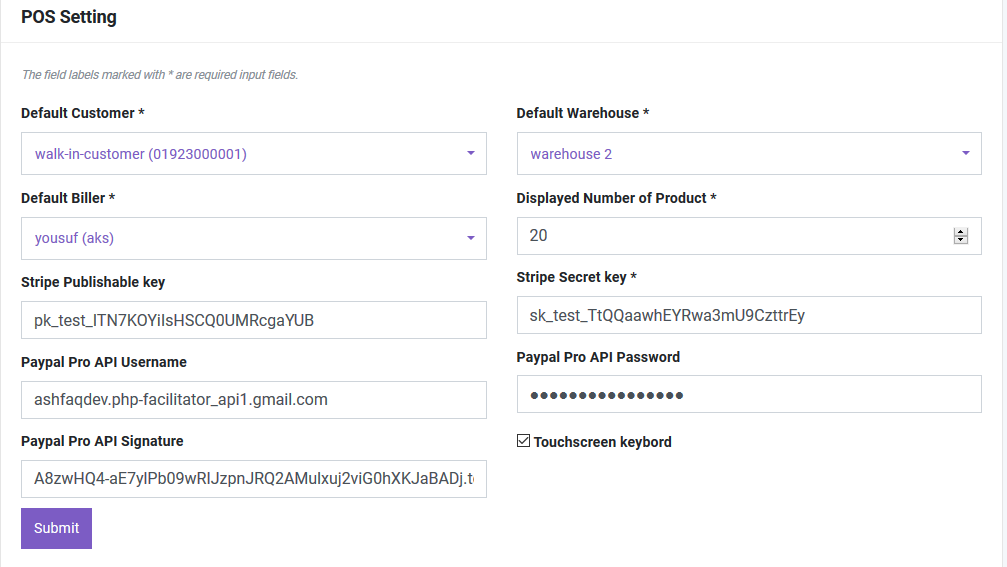
POS Settings
You can set your own POS settings from this module. You can set default customer, biller, warehouse and how many Featured products will be displayed in the POS module. You have to set your Stripe public and private key for Credit Card Payment. To implement payment with Paypal you have to buy live api from Paypal. You will also need to fillup the following information.
HRM Setting
You can set default CheckIn and CheckOut time in HRM Setting.
SMS Setting
You can use Bulk SMS service via Twilio and Clickatell. You just have to fill the information correctly to activate this service. Please provide country code to send sms.
Translations
Change Language
You can change your desired language from here.

After clicking, a window will appear like this and you can change default language from here.

Manage Languages
To manage language please go to Settings -> Languages

In Languages page,
- You can Add new Language by providing it’s locale code and name. It is highly preferable to give locale code and name properly.
- You can change default language by clicking Set Default.
- You can also Update or Delete a Language But you can not Delete a Default language. Here, you can not Delete English language and if you want to delete it then you have to select another Language as Default first.
If you want to Manage Translations then please click to Manage Translations on top right corner. Or, top left corner if your layout is Right to Left(RTL).

Manage Translations
In Translations page,
- You can select any Language to see it’s list of translations and Edit/Delete. Note: Selecting Language will not change Default Language
- You can Add translation by providing Key and Value. Key must be in English.
- You can search any Translation by typing Key or Value.
- You can Update or Delete translations by using Actions button.
Note: Before Add or Edit translations make sure you select the right Language.
